Skip to content
OpenCms documentation

Module development

With OpenCms 10 several features are introduced that ease OpenCms development. We take a look at these features and explain how to use them efficiently.

In particular, we

  • Explain the Module Import/Export via the SMB share
  • Look at the advantages of the reduced export format for modules
  • Explore the OpenCms Git integration
  • See how to adjust configuration files on start up

Your Java code will typically use the OpenCms Java API. For development, we recommend the Eclipse IDE with Gradle for build automation. If configured correctly, gradle will automatically handle all dependencies of your code to the OpenCms core.

In the remainder of the section, we describe how to set up your own Eclipse project.

We assume you already have installed Eclipse and Gradle as described here.

Dialog for creating a new Gradle project

We recommend you create a Gradle project. This is done choosing "File" -> "New" -> "Project" -> "Gradle project". Doing so, you'll get the following dialog:

When the project is created, adjust it as follows:

  • Delete the folders in the build path
  • Add folder src/ to the build path
  • Replace the content of build.gradle by (a variation of) the code shown below.
apply plugin: 'java'

sourceCompatibility = 1.6
targetCompatibility = 1.6
version = '1.0'

repositories {
    mavenCentral()
}

sourceSets{
    main {
        java.srcDir 'src'
        resources.srcDir 'src'
    }
}

dependencies {
    compile group: 'org.opencms', name: 'opencms-core', version: '9.0.1'
}

jar {
    manifest {
        attributes 'Implementation-Title': 'OpenCms module', 'Implementation-Version': version
    }
}

When you have adjusted your project, refresh the dependencies. Therefore, right-click on your project and choose "Gradle" -> "Refresh Dependencies". This will add the OpenCms core as a dependency to your project and thus make it available for development.

Refreshing dependencies may take some time since the new dependencies are downloaded.

OpenCms releases are available at http://mvnrepository.com and Gradle grabs the dependencies from there. That's what you configure by

repositories { mavenCentral() }
…
dependencies { compile group: 'org.opencms', name: 'opencms-core', version: '9.0.1' }

Note that the core does not provide all modules usually provided by OpenCms. If you require further dependencies, search for them at the MVNrepository and copy the dependency string into your gradle.build file.

We recommend placing your code in packages that are named as the module that the code is shipped with. It's a convention, not law, but useful. In the packages, just add classes as you like. When your setup is correct, you should have full access to the OpenCms API, can look into its code and get auto-completion.

When it comes to compiling, choose "Run as" -> "External tools configurations ..." and select "Gradle Build". In the dialog that appears, you add a new configuration for your project and select the task "jar". It will compile all your classes and put them in a jar file when you run the configuration. The resulting jar is found in the subfolder /build/libs/ of your project's main folder.

To expose the library in OpenCms, copy it to the folder /WEB-INF/lib/ of your OpenCms' webapp home folder on the RFS. When you want to ship the jar with your module, add it in the module's /lib/ subfolder in the VFS and set the export point for that folder to /WEB-INF/lib/.

It may be a good idea to use git to control different versions of your code. Also, you may consider placing the whole module in your project and putting it under version control. You'll still edit module resources in OpenCms, but export the module and place the (unzipped) export in a folder of your project.

OpenCms development involves writing Java source code, writing JSPs, creating modules, designing resource types and so on. Changes take place in pure Java code that's later on added as a jar, but changes also take place on VFS resources. Additionally, actions like creating a new module or a new resource type are optimally performed directly in OpenCms.

Thus, it is valuable if development can take place directly on an OpenCms instance - that is either locally installed or on a remote server. But working exclusively on that instance, in particular when editing JSPs, will slow you down because you can't work in your normal development environment and will miss the features of your preferred IDE. The combination of both, working in your normal environment and at the same time on the OpenCms instance directly, provides a good development environment and can be reached by mounting the VFS - optimally inside a project of your favorite IDE. Doing so, you can edit resources as you are used to and directly reflect the changes to the VFS.

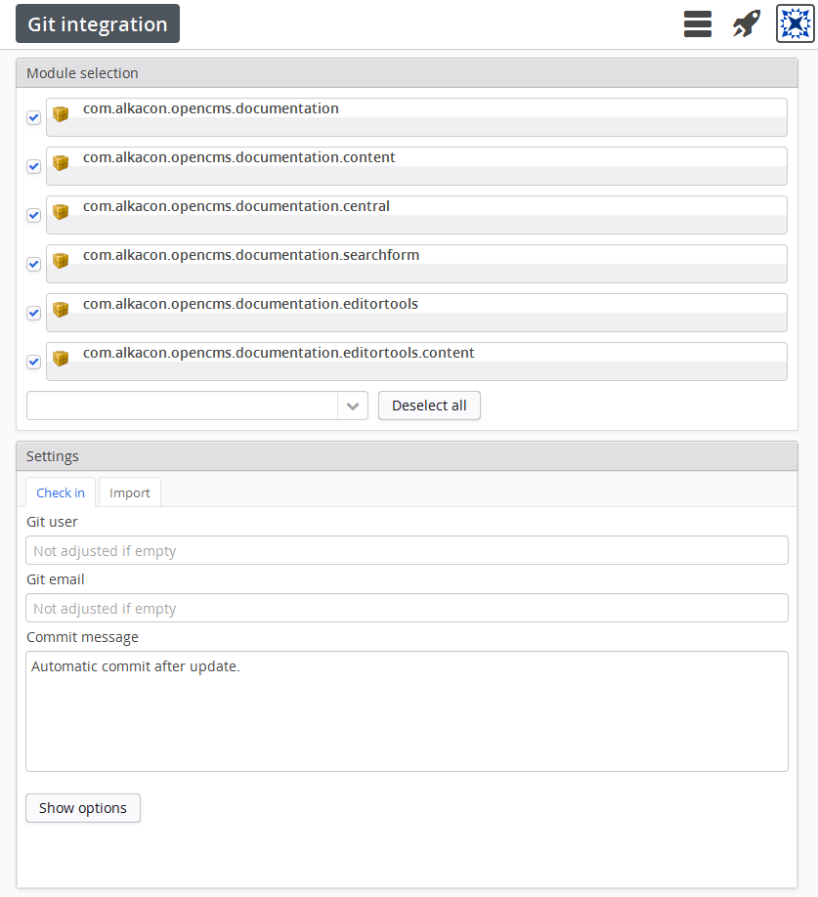
The benefit of mounting the VFS is already great, but there is still a problem remaining: Typically, you use a version control system to track changes in your code. That means, you have to check in changes to that system frequently. The usual way to structure your code in the version control system is via module specific subfolders. In these folders you place the extracted module export plus the Java sources of a library that belongs to the module. But how to get the changes into the repository and back to an OpenCms instance? Up to OpenCms 10 this was an error prone process of many manual steps: Use the OpenCms module management to export the module you want to check in, clean the folder with the module resources in the repository, extract the exported module zip to the just cleaned folder, check in the changes.

OpenCms 10 provides, at least on Linux systems, support for the check in of modules to a git repository, as well as for the automatic (re-)installation of modules via the OpenCms workplace. Moreover, even not using the Git integration, module import and export is simplified: Modules can be installed, removed, updated via special folders in the network share.

Another burden that is tackled in OpenCms 10 is the problem of merge conflicts. Up to OpenCms 9.5, the manifest files of modules were always very verbose, providing various meta information for each resource (creation date, creator, date last modified, user last modified, ...). These information necessarily lead to merge conflicts. For example, if two different developers edited the same JSP a merge conflict was very likely. Even if the JSP itself could be merged, the manifest caused problems. Moreover, meta information on parent folders, not belonging to the module itself change frequently. In particular /system and /system/modules have different meta information on each installation. Hence, that data changed frequently in commits, even if nothing interesting changed at all. Thus, we had unnecessary, irritating changes in the commits. In OpenCms 10 one can choose between the normal export format, that is similar to the verbose one from OpenCms 9.5, and a reduced export format that omits the export of potentially conflicting meta information.

Using the reduced module export format

Since OpenCms 10 two export formats for modules are present: a reduced and a verbose one. The difference is the data that is stored in the manifest.xml in the exported module zip file. We recommend using the reduced export format as long as you do not have a serious reason for exporting more information. The reduced format is in particular recommended if you track your changes in a version control system. The format omits lots of meta information. This information, e.g., who has when created or edited a resource, is typically unnecessary since your version control system will take record of these information anyway. Moreover, keeping the extra information also in the manifest file likely causes merge conflicts.

To set the export format, go to the module management, select your module and edit it. As shown below, you have to check the setting "Use reduced export format"

The workplace app 'Git integration'

Checking in changes made on modules in OpenCms to a version control system can be quite cumbersome. The OpenCms Git integration tackles that problem. You simply configure where your repository is and which modules you want to check in or check out and install from the repository. Then the workplace app "Git integration" provides an easy way to check in or check out and install modules.

The tool only works on Linux systems, since it uses a shell script for the git actions. Furthermore, git must be installed independently from OpenCms.

Via the Git integration you can perform check in and (re-)installation of modules from within the OpenCms and in just a few clicks. The figure shows the dialog for the tool when configured correctly.

Since OpenCms 11, the tool is only shown if a valid configuration is present. To get more control on the checked-in changes, we recommend to use the feature from the shell for most scenarios.

Via the workplace app "Git integration" you can select the modules you want to check in. The modules appearing in the list are pre-configured, but you can also add new modules via the drop-down left of the "Deselect all" button. Moreover, you can set your user information for the commit and the commit message. There are other options available. Via these, you specify copy, unzip, pull and push options. The options checked by default are configurable. Therefore, you typically do not have to alter these options. For example, you can only copy and unzip the module to your local repository and perform checkin manually. This will provide you more fine-grained influence on what is checked in. But you can also automatically check in and push your changes.

When directly checking in to the repository and pushing changes, you can only replace the whole module, i.e., all changes you made to the module are checked in.

Besides checking in changes to your git repository, you can reimport modules directly from the repository. Choose the "Import"-tab in the settings panel shown in the git integration app and select the module you want to import. Moreover, you can choose if you want to fetch the remote state of the repository and reset to the remote head before you import the module, or if you just import the current local version.

Import basically zips the module resources. It does not compile any Java code.

The backend of the Git integration app a is a shell script and a configuration file placed under {webapp home}/WEB-INF/git-scripts/. The script module-checkin.sh is used to perform the git operations and the configuration is read from module-checkin.conf. A good starting point for writing your configuration is to copy the module-checkin.conf.demo file and adjust it to your needs. In particular, you should correctly configure your repository home and structure. Descriptions are found in module-checkin.conf.demo.

The options you set in module-checkin.conf can be overwritten in most cases. You can overwrite them by passing parameters to module-checkin.sh. That's what the Git integration app does. It reads the default options from module-checkin.conf and then passes the possibly changed options as parameters.

If you use environment variables in the module-checkin.conf file, make sure that the Git app (i.e., Tomcat or alike) has these variables set.

For many purposes, the OpenCms app "Git integration" will provide the suitable way to check in changes. But you can also call module-checkin.sh directly from the command line. If you work in your favorite IDE using a network share this might be an option as well.

The script expects all parameters first and then the configuration file. To get an overview on the parameters, please refer to the script itself and search for "read commandline arguments".

For using the script directly, you need to import and export modules via the network share. The reason is, that the Git integration app triggers module import and export directly in OpenCms, but the script cannot use that functionality.

A typical scenario for using the script directly could be, that you export and unzip modules to a repository you have present in a project in your IDE. You check the changes and commit via the IDE and then build the module again and copy it to the module import folder of the network share.

In summary, you have a lot of control on what is done automatically, and where you take action manually. Of course, all this can also be achieved using the Git integration app.

Since OpenCms 9.0 you can mount the VFS via a network share. OpenCms 10.0 adds a new feature to the share. You can import and export modules.

The feature is enabled by default. If it is not enabled in your installation, please look here how to find out how the org.opencms.file.wrapper.CmsResourceWrapperModules is configured.

If configured correctly, the VFS mount has three additional folders: /modules/import/, /modules/export/ and /modules/log/. The export/ folder lists zip files for all modules installed on the system. The import/ folder is always empty and the log/ folder holds for each module in the system a log file with the actions performed on this module. Use the folders as follows to import, export or remove modules.

Go to the /modules/export/ folder of the VFS mount and copy the module zip of the module you like to export to another location. The module will be exported on the fly during the copy action.

Go to the /modules/import/ folder of the VFS mount and paste the module zip of the module you want to import. The module will be imported on the fly during the paste action. When the import is finished, the zip file will vanish from the /modules/import/ folder.

Go to the /modules/export/ folder of the VFS mount and delete the module zip for the module you want to delete. The module will be deleted on the fly during the delete action.

To import/export/delete modules relative to the correct site, set the "Import site" for modules (Module Management -> Edit module) that are not imported to the root site, but handled over the network share.