You can follow the tutorial step by step, starting from a plain OpenCms 10.5 installation with demo modules. The links in the tutorial assume, the installation is available under http://localhost:8080/opencms/.
In OpenCms you can build multilingual websites easily. Starting with an unilingual website, the tutorial tells you how to add localizations.
There are two ways to add localizations:
- The multi-tree approach: That means, each translation of the website has it's own folder tree. This way localizations of the site can diverge in content and structure.
- The single-tree approach: That means, we keep the single folder tree of the unilingual site and make it accessible in various locales.
The tutorial covers both approaches. You can decide which approach you choose. Both have their pros and cons that are briefly discussed as well.
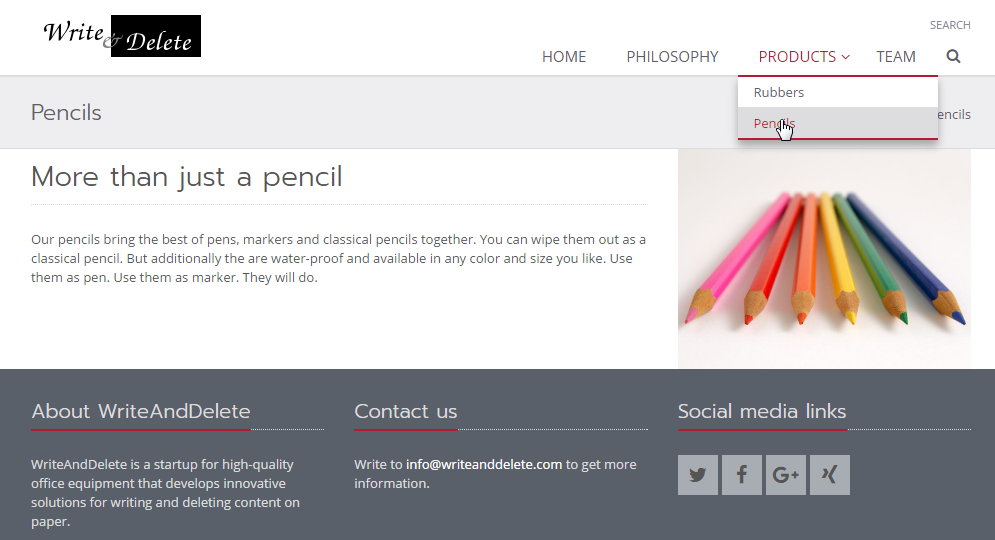
We start with a tiny demo-site of the fictitious company "WriteAndDelete". It has just a few pages an exists in English. We add German and French as additional languages.
You can download the content of the site here. You need to have the Apollo demo modules installed. Then you can add a new site to your OpenCms installation and choose the Apollo template JSP as template (i.e.,
/system/modules/org.opencms.apollo/templates/apollo-page.jsp). Import the content into that site.The demo contents will only work with OpenCms 10.5.1.
Before we start to add localized variants of our website, we need to configure the locales (languages) we want to support. In OpenCms locales must be configured in the opencms-system.xml. By default English and German are configured. We want to support French as well and thus need to add it.
- Open the
opencms-system.xml(found under{webapp home}/WEB-INF/config/) and edit the elementslocalesconfiguredandlocalesdefault, such that they look as follows:
<localesconfigured>
<locale>en</locale>
<locale>de</locale>
<locale>fr</locale>
</localesconfigured>
<localesdefault>
<locale>en</locale>
<locale>de</locale>
<locale>fr</locale>
</localesdefault>
When you are done with the changes, restart OpenCms (the servlet-container).
To check if your changes worked, edit a content from some page of the site. The language selector should provide English, German and (that's new because of the adjuste configuration) French.

Before you go on, you have to decide which approach you want to take for adding locale variants of the tutorial website.
There are two approaches for adding the German and the French translation of the tutorial website. You can go either way.
The multi-tree approach is very flexible. It's basically as flexible as setting up completely independent websites for each locale. OpenCms provides a suitable UI to keep track of which pages are locale variants of each other and good support to add new locale variants of pages. But still, you have to keep track of a single folder tree for each locale variant of the website. So the approach is basically suitable for all use cases, but causes a bit more set up and maintenance effort than the single-tree approach.
The single-tree approach is very easy to set up and maintain. Basically, you have each page just once and render it for different locales. As a side-effect, you have (except of a locale prefix) the same URLs for the different locale variants, which might be a SEO problem. Moreover, you cannot have a diverging structure for the different locale variants of the site. The approach is optimal for web applications, e.g., customer portals, where the same functionality is provided in each language and SEO does not matter.
If you have decided on your approach:
If you want to try both approaches in parallel, you should use separate OpenCms installations. Importing the tutorial content twice in different sites will probably cause problems, because the ids of the imported contents already exist.
Go on here to take the multi-tree approach. That means, we copy the pages to locale-specific sub-sitemaps and relate them as locale variants.
If you want to stick to a single-tree and serve the different locale variants via the same container-pages, go on here.
To configure the multi-tree localization mode for the tutorial site, open the Launchpad and choose the Site Management. Choose the site were you placed the tuturial's content and edit it. Below, this site is named "Multi-Tree".
You need to add two parameters:
locale.main=en: This means that English is the primary variant of your website. Pages are all first created in English and copied to other locales afterwards.locale.secondary=de,fr: You specify German and French as secondary locales. These are the languages, you want to copy English pages to.
Our configuration means, that we have a main version of the site in English and we want to (partly) translate pages to German and French.
At the moment, the English version of our website starts directly below the site root. If we have various language variants, it is beneficial to place each of them in separate sub-sitemaps directly below the site root. This is not mandatory, but, e.g., starting at the same folder level eases reusing navigations.
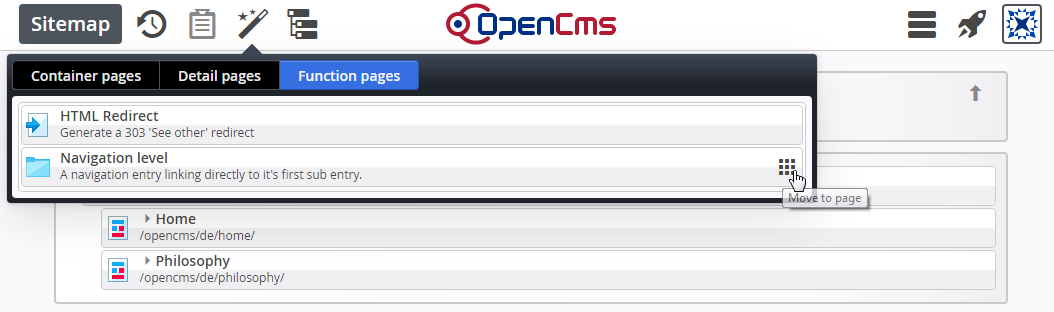
So go to the Sitemap editor's "Sitemap" view and add Navigation levels "en", "de" and "fr" directly below the site root. Convert all of them to sub-sitemaps. Use the option "Create sub-sitemap" under "Advanced" in the context menu of the navigation levels. Furthermore, set the "locale" property to the folder's name on all of the sub-sitemaps. That causes pages inside the sub-sitemap to be rendered in the respective locale.
To do so, switch to the sitemap editor's "Resources" view and for each of the just created subsitemaps, open the sitemap, click on the context menu of the subsitemap's root folder, choose "Properties", switch to the "Complete Properties" tab, open the "Unused Properties" where you find "locale" and set it accordingly.
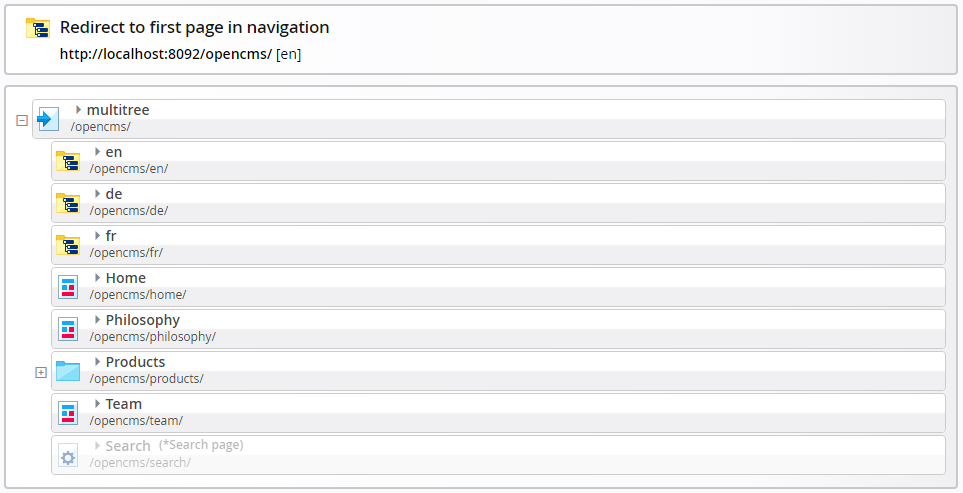
Now open the explorer and move the folders of the already existing pages (home, philosophy, products, team, search) into the folder "en". Since we have used navigation levels and always redirect to the first sub-page everything will work out fine.
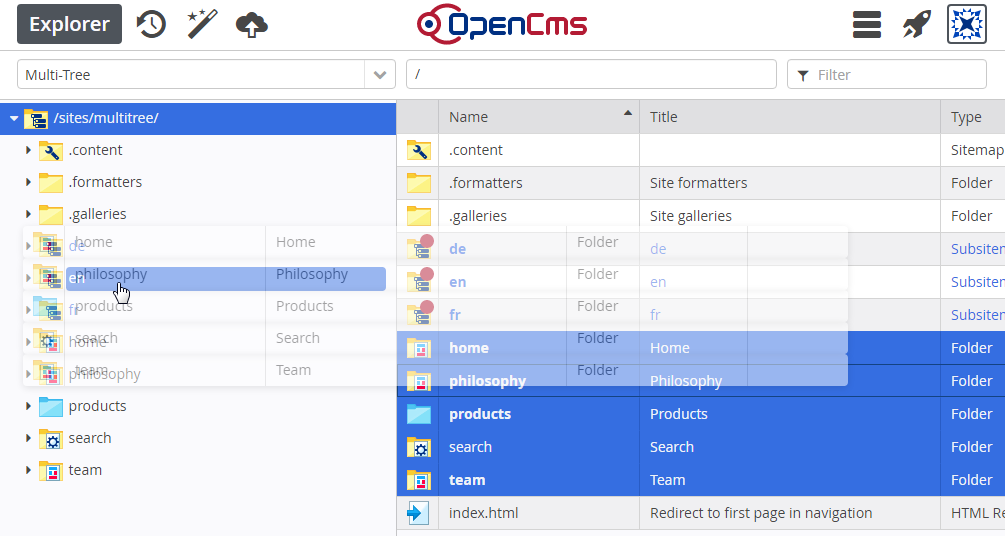
You can copy or move resources via drag & drop. Do not forget to select "Move resources" as copy mode in the dialog that pops up when you drop the folders. Also do not move the "index.html".
The last thing to do is to adjust the navigation content. It displays the navigation starting directly below the site root. Now that we have an extra folder level before the "real" pages start, we need to adjust the navigation.
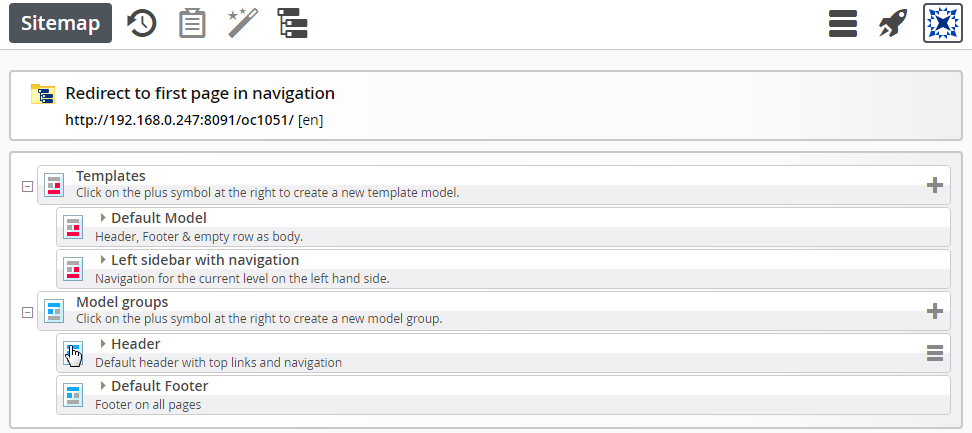
The tutorial site uses a reuse group for the header that contains the navigation. Therefor, it suffices to adjust the navigation just once. Go to the Templates view of the sitemap editor and open the model group "Header". You are asked if you really want to edit the model group: Say yes! Then edit the navigation element in the "Header" model group. Set "Navigation Start Level" to "1 - First Level". That's it. For the English version of your website the navigation should work again as expected. Try it.
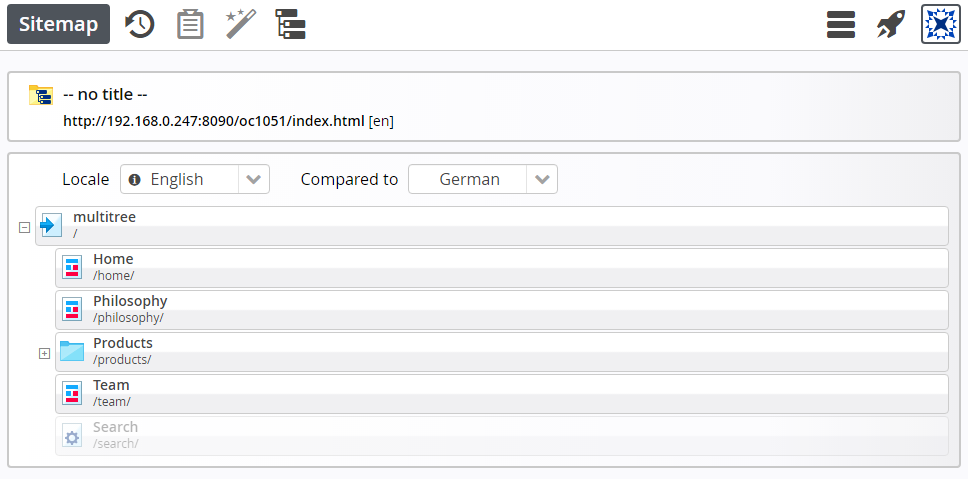
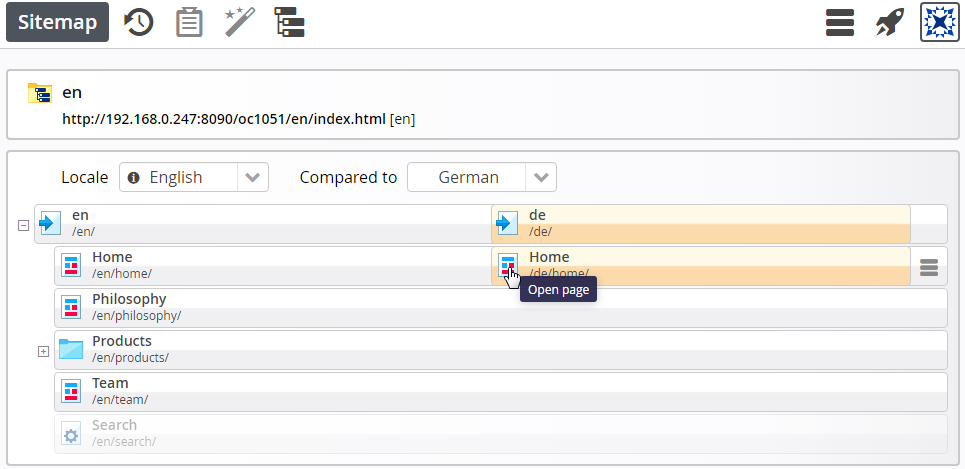
At the moment, we have a sub-sitemap for each locale variant of the website. But only the English sub-sitemap contains pages. Open the sitemap editor in the English sub-sitemap and go to the "Compare locales" view. First we link the roots of our sitemaps: Click "Link locale" in the context menu of the site root "en". Link it to "de" as displayed in the following two figures. Link it also to "fr". To do so switch the "Compared to" locale to "French" first.

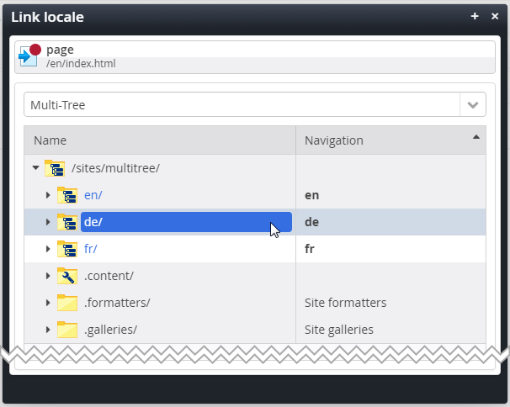
In the dialog that pops up, choose the "de" sub-sitemap.
When the roots of the sub-sitemaps are linked, you can switch "Locale" to all the different languages. Doing so, you see the sitemap tree for the different locales.
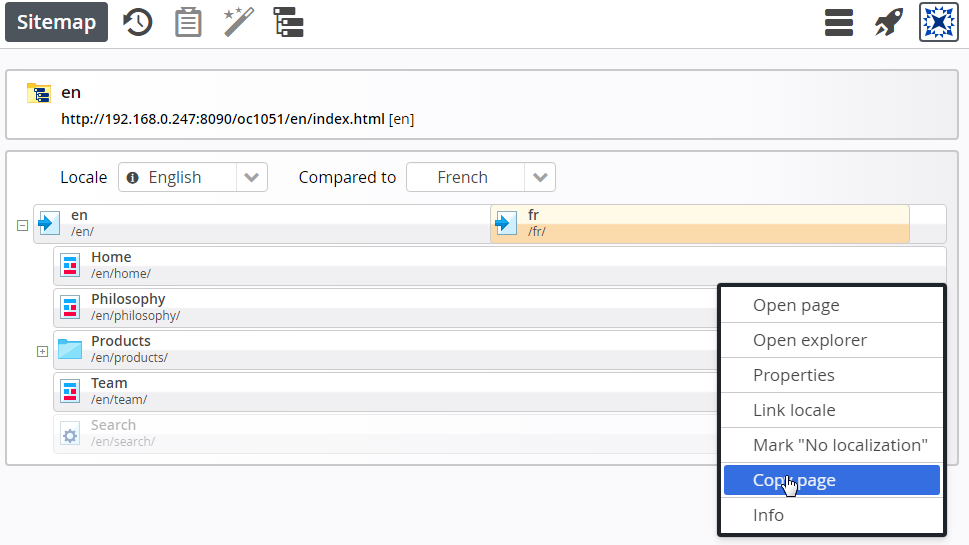
Having linked the roots of the subsitemaps, we go on and copy the English pages to the German and the French subsitemaps. Let's start with "Home" and copy it to German. Open the context menu of the "Home" page and choose "Copy page".
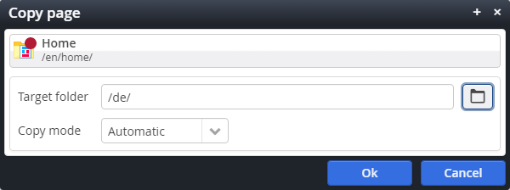
Copy the "Home" page to target folder "/de/".
When copying there's a "Copy mode" selection with the following options:
- Automatic: The mode is equal to "Reuse elements" when copying to another locale, it is equal to "Copy elements" when copying to the same locale
- Reuse elements: Only the container page is copied. None of the elements on the page are copied.
- Copy elements: The container page and the elements with "Copy this element" checked are copied. These are typically the elements that contain visible content, but not layout elements that should be reused on each page.
We can stick to the copy mode "Automatic" in our scenario. We have all contents directly below the site-root and share them in all locale specific sub-sitemaps.
After we copied the page, it is automatically linked to the English "Home" page. This is displayed in the "Compare locales" view.If not, reload the page. Now we can start translating the content of our copy. Navigate to the German "Home" page by clicking on the icon of the German "Home" page.
Because nothing is translated yet, the German page looks exactly as the English one. Since German is not available, the English content version is shown. To add a German version, just edit the content - inline or via the form based editor. The english content version will be copied to the German version and you edit this copy directly. That's a new feature in OpenCms 10.5.
When you have finished, go on, copy and translate all the other pages to German and French in the same manner. Doing so, you will encounter a tiny problem: The navigation level "Products" cannot be copied. Copying is only implemented for container pages. So just go to the German (French) sub-sitemap in the Sitemap editor's Sitemap view, create the respective navigation levels and link them to the English version as we have done for the roots of the sub-sitemaps before.
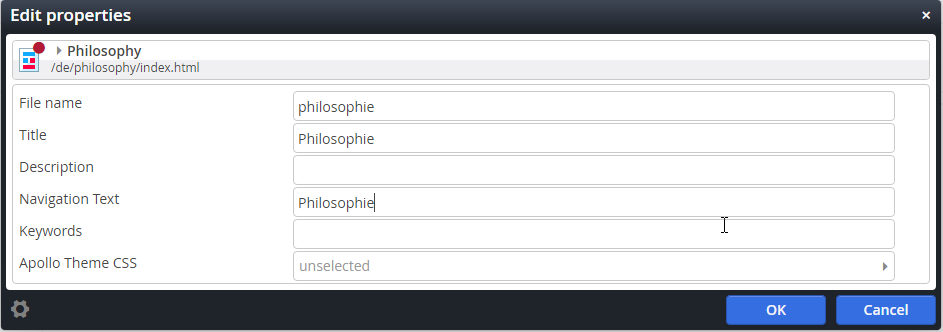
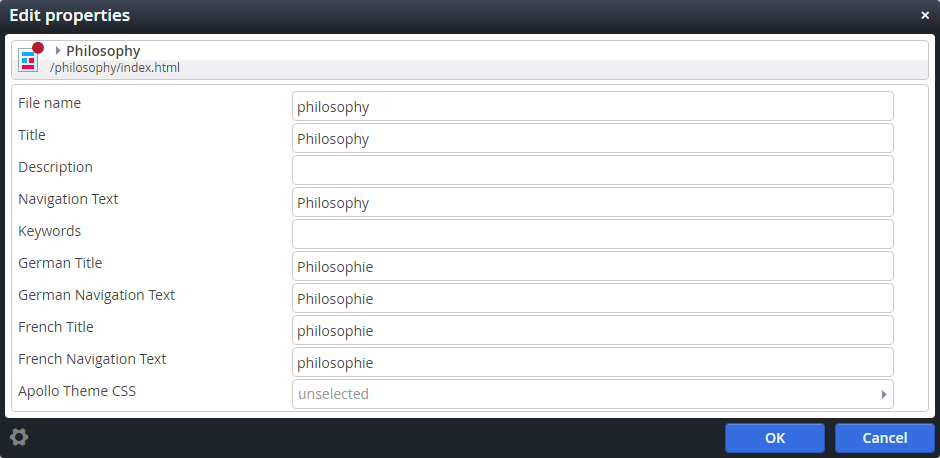
A big advantage of the multi-tree approach is that URLs can be different for the various locale variants. We want to adjust the properties and the URL for the "Philosophy" page. Go to the German sub-sitemap in the Sitemap editor. Stay in the Sitemap view and open the context menu of the "Philosophy" page. Choose the "Properties" option. Here you can edit "File name", "Title" and "Navigation Text". For the German page we replace "Philosophy" by "Philosophie" for all the mentioned properties.
Go on and adjust URLs and properties for all other pages - in German and in French.
Our website already exists in three different locale variants. To let the user visiting the site switch from one locale to another, a language switcher is necessary. It should work as follows: For each page, you should be able to switch to all available translations. If no translation is available, you can either not switch or go to the home page in the target locale. Of course, these are suggestions and you can implement a different logic if you like.
The Apollo-Template already contains a locale switcher. And you may have noticed, that it already appeared above the main navigation. It is rendered by a "Link Sequence" that resides in the "Header" model group used on all pages.
The link sequence is formatted by /system/modules/org.opencms.apollo/formatters/linksequence-head.jsp. It uses the tag <apollo:language-linklist /> to produce the language links. You find the tag under /system/modules/org.opencms.apollo/tags/language-linklist.tag. It is advanced in the way, that you are taken to the home page of a respective locale, if the current page is not translated and that you see the language names in the according language's translation. Check out the tag to see how this is done.
Here's simpler version of a language switch that basically does the same thing, but just displays "DE", "EN" etc. instead of the localized Language names and simply does omit languages for which the current page is not translated (has no locale variant):
<c:set var="langlinks" value="" />
<c:set var="showlang" value="false" />
<c:forEach var="locentry" items="${cms.localeResource}">
  <c:choose>
    <c:when test="${empty locentry.value}"></c:when>
    <c:when test="${locentry.key == cms.locale}">
      <c:set var="langlinks">
        ${langlinks}
        <li class="active"><a href="#">${locentry.key}${' '}<i class="fa fa-check"></i></a></li>
      </c:set>
    </c:when>
    <c:otherwise>
      <c:set var="showlang" value="true" />
      <c:set var="langlinks">
        ${langlinks}
        <li><a href="${locentry.value.link}">${locentry.key}</a></li>
      </c:set>
    </c:otherwise>
  </c:choose>
</c:forEach>
<c:if test="${showlang}">
  <!-- output the language switch -->
</c:if>
The most important bit in the code is ${cms.localeResource} in line 3. It returns a map from locales (as String) to the respective locale variant of the currently rendered page. The map has an entry for each locale configured for the site (see here for configuring locales). In our case for "en", "de" and "fr". If no locale variant of the currently rendered page exists for one of the configured locales, the map's entry contains an empty value. Otherwise, the value provides access to the locale variant of the page via a CmsJspResourceWrapper.
Having added the language switch, you are done. Congratulations to your multi-lingual website!
We started with a website available only in English. During the tutorial, we translated the page to German and French. We ended up with complete translations of the site. In general, it is not necessary to translate everything. Basically, the three locale variants of the site are completely independent. Only single pages are linked via the "locale variant" relation to keep track of what page is a translation of another. This independence results in great flexibilty. You can:
- translate only part of the pages of your website
- have different folder structures for differerent langugages
- link pages with different content (elements) as locale variants of each other
- have locally stored content copies for each of the locale variants (e.g., using "Copy elements" as copy mode)
Moreover, it is possible to link pages from different sites via the "locale variant" relation. The same main locale needs to be configured for the sites.
With the just described flexibilty, the multi-tree approach should be suitable for nearly every scenario. It works really well
- if you have your website in the main language already present and then start adding more locale variants,
- if you add a new page in the main language and then add translations,
- if you change existing content elements.
The restrictions of the approach are that
- pages can only be related via the main locale,
- adding/deleting a content element in one locale variant of a page is not automatically reflected in the other locale variants.
The second restriction can also be considered as a "plus". The first one typically should not cause problems.
The flexibility of the approach makes it suitable for all scenarios.
Single-tree approach means that the website's structure does not change at all. We have one folder tree that is used to serve the content for all languages. We only translate the contents on the pages of the website and configure a different link substitution and locale handler to make the page available under locale-specific URLs. Here's how serving the different locale variants of a page works:
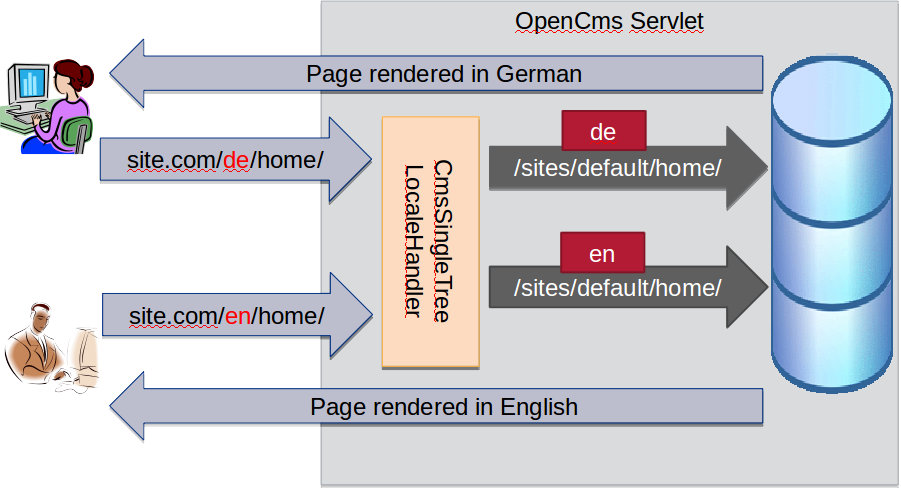
The website's visitor calls a specific localization of a webpage by adding the locale he wants as prefix to the URL. Internally, a special locale handler removes the locale prefix from the URL and uses it to set the locale in the request context.
For links generated by the system, a special link handler is configured that adds the locale-prefixes to the URLs in the link.
To configure locale handling for the single-tree approach, edit the opencms-system.xml and substitute
<localehandler class="org.opencms.i18n.CmsDefaultLocaleHandler"/>by
<localehandler class="org.opencms.i18n.CmsSingleTreeLocaleHandler"/>To configure link substitution for the single-tree approach, edit the opencms-importexport.xml and substitute
<linksubstitutionhandler>org.opencms.staticexport.CmsDefaultLinkSubstitutionHandler</linksubstitutionhandler>by
<linksubstitutionhandler>org.opencms.staticexport.CmsLocalePrefixLinkSubstitutionHandler</linksubstitutionhandler>The handlers act exactly like the default handlers unless a site is configured to use the "singleTree" localization mode. So you can change the configurations, restart OpenCms and everything should work as before.
To enable the adjusted locale handling and link substitution for the site with the tutorial content, go to the "Site Management" and edit the site with the tutorial contents. Add the parameter localizationMode=singleTree.
When all the configuration steps are performed, you should be able to open the URLs localhost:8080/opencms/en/home/, localhost:8080/opencms/de/home/ and localhost:8080/opencms/fr/home/. All should show the same page (since no contents are translated yet).
To switch between the different locale variants of a page, we need a language switch. We replace the one shipped with the Apollo Demo. It is used by the link sequence formatter linksequence-head.jsp in /system/modules/org.opencms.apollo/formatters/, where it is included via the tag <apollo:language-linklist />. The tag's code is placed in language-linklist.tag under /system/modules/org.opencms.apollo/tags/. We simply edit this file to adjust the language switcher implementation.
Here's the part to adjust: Replace the lines between <c:set var="showlinks" value="false" /> and <c:if test="${showlinks}"> in the tagThe original switch is designed for the multi-tree localization mode. with:
<c:forEach var="locale" items="${cms.availableLocales}">
  <c:choose>
    <c:when test="${locale == cms.locale}">
      <c:set var="langlinks">
        ${langlinks}
        <li class="active"><a href="#">${locale}${' '}<i class="fa fa-check"></i></a></li>
      </c:set>
    </c:when>
    <c:otherwise>
      <c:set var="showlinks" value="true" />
      <c:set var="langlinks">
        ${langlinks}
        <li><a href="<cms:link locale='${locale}'>${cms.requestContext.uri}</cms:link>">${locale}</a></li>
      </c:set>
    </c:otherwise>
  </c:choose>
</c:forEach>
The most interesting bits of the language switch code are
${cms.availableLocales}, which provides you the available locales for the currently requested resource<cms:link locale='${locale}'>...</cms:link>, where thelocaleattribute determines the language for the generated link.
To translate the content, just go to the language version of a page for which you want to add the translation and start editing. To translate the "Home" page to German, open localhost:8080/opencms/de/home/ to get the German variant of the "Home" page opened in the page editor. Nothing is translated yet, so the German page looks exactly as the English one. Since German is not available, English content is shown. To add German content, just start editing - inline or via the form based editor. OpenCms will copy the English content version to the German version when before it is edited. That's a new feature in OpenCms 10.5.
When you have finished with the German "Home" page, go on and translate the other pages.
Up to now, we have translated contents. But, e.g., the navigation on the pages is build using page properties. In particular NavText and Title are used. Properties in OpenCms are unilingual by nature. To read properties locale-specific, OpenCms 10.5 introduces a mechanism to simulate multilingual properties. Property names can be extended by a locale specific postfix and then be read locale specific.
For example, besides the property Title, we can add the properties Title_de and Title_fr. If we request the Title property for German, we get the value of Title_de. If we request it for French, we get the value of Title_fr. If we request it in English we get Title, since Title_en is not provided.
We use the multilingual properties to localize Title and NavText in the tutorial.
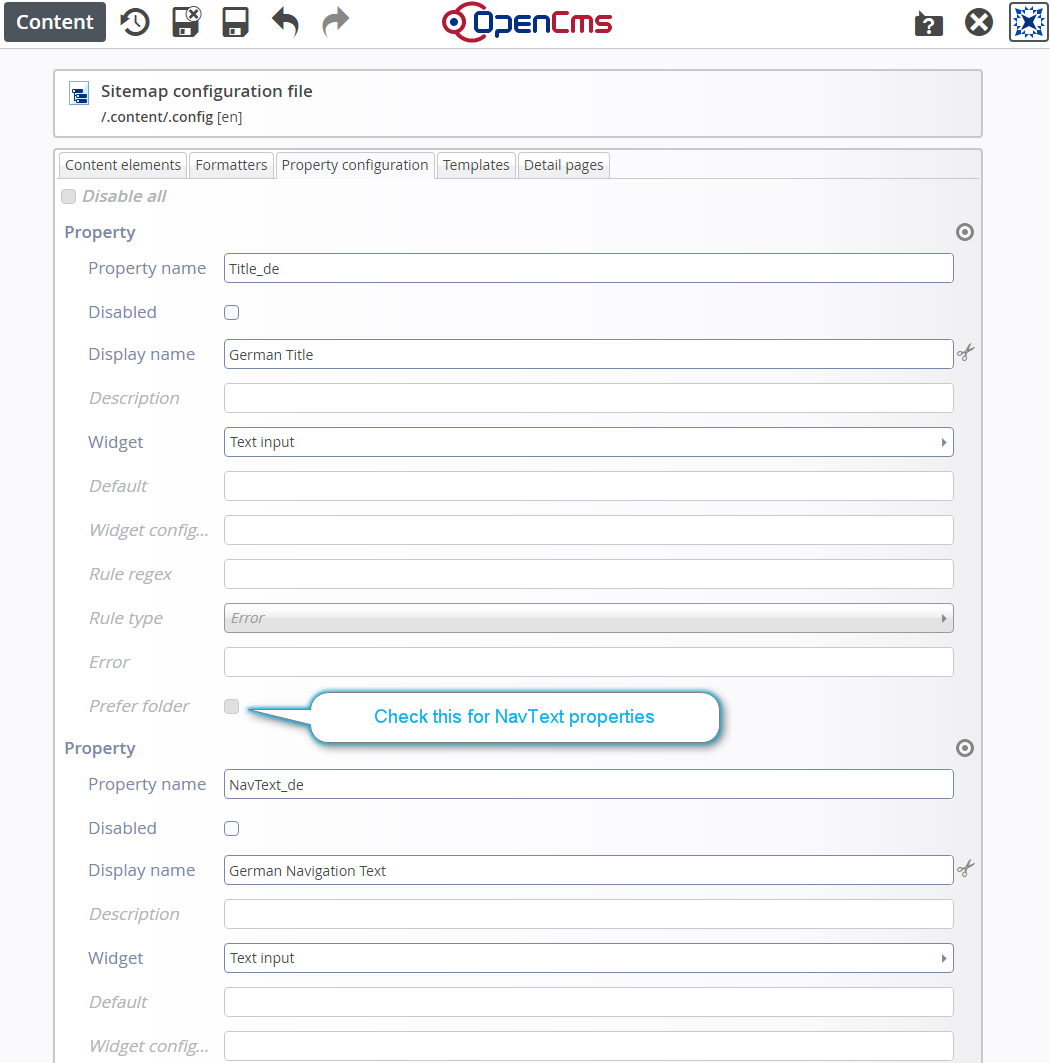
First we need to add property configurations for Title_de, Title_fr, NavText_de and NavText_fr to the sitemap configuration. Open the Sitemap editor in the Sitemap view and select "Advanced" -> "Sitemap configuration". Below, you see part of the configurations to add. Check the "Prefer folder" option for NavText properties. If checked, properties are added to the folder of a page instead of adding it to the index.html.
When the configuration is done, stay in the Sitemap editor's Sitemap view and choose "Properties" from the context menu of the "Philosophy" page. The just configured properties should appear and you can add values for them as shown in the next figure.
After adding the different locale specific versions of the properties, we do not see the intended effect directly. We have to adjust the JSPs rendering the page title and the navigation. We need to tell that properties should be accessed locale specific.
Open the formatter for the head navigation used in our template. It is located under /system/modules/org.opencms.apollo/formatters/navigation-head.jsp. Replace ${cms.title} by ${cms.titleLocale[cms.locale]} to read the page title locale specific. Perform the same adjustment in the template JSP /system/modules/org.opencms.apollo/templates/apollo-page.jsp to make the title in HTML meta data locale specific.
The navigation-head.jsp formatter uses the tag /system/modules/org.opencms.apollo/tags/nav-items.tag. It uses the <cms:navigation> tag to generate the navigation. Have a look at the usage. The attribute locale="${cms.locale}" is provided. Doing so, the navigation properties are read locale specific.
Now the page titles and the navigation are shown localized. Of course, reading properties locale specific is not restricted to navigation properties. The mechanism works for all properties.
Our page is already available in the locale variants we wanted. So the tutorial could be finished here. But it might be the case, that you want to link to a specific locale variant of a page.
Creating a link in a JSP we can use <cms:link> with the locale attribute to specify in which locale the linked page should be rendered. Placing the link in a content, we cannot use the tag. Here we can add the parameter __locale={target locale} to the link. E.g., a link to the English "Home" page would look like
/home/?__locale=en
If the __locale parameter is not provided, we the link target is rendered in the same locale as the page with the link on. I.e., if you do not want to switch the locale, you don't need the extra parameter.
The main advantages of the single-tree approach are
- it is very easy to set up. You can use your existing uni-lingual page, change some configurations and start translating,
- it is easy to maintain, since there are no duplicate folder structures.
The ease of use and maintance is a big advantage, but it causes also some drawbacks:
- you publish always all language versions (since the contents rendered are necessarily the same in each locale variant of a page)
- you have the same folder names in the URLs for each locale variant (which is bad in terms of SEO)
Summing up the pros and cons, the single-tree approach is probably very suitable for "Applications". For example, customer portals, where you have a fixed functionality that should be accessible in various languages. In this scenario SEO is not important, since only customers get a login or an invitation or some other information to be directed to the page.