Localization has two facets: Multilingual websites and multilingual user interfaces. If, for example, you have a content editor that is natively English and thus prefers the English language. He may want to have all menus, infos, and so on, coming from OpenCms in English. However, if he edits a German website, the content he sees and modifies has to be German. The difference is noticed best by the figure below.
This topic is concerned about the user interface localization for OpenCms users. The locale of these interfaces we call workplace locale. The topic tells you:
- How to localize the content editors
- How the localization of the traditional workplace and the ADE interfaces works
To understand the topic fully, you have to know how message bundles work in OpenCms.
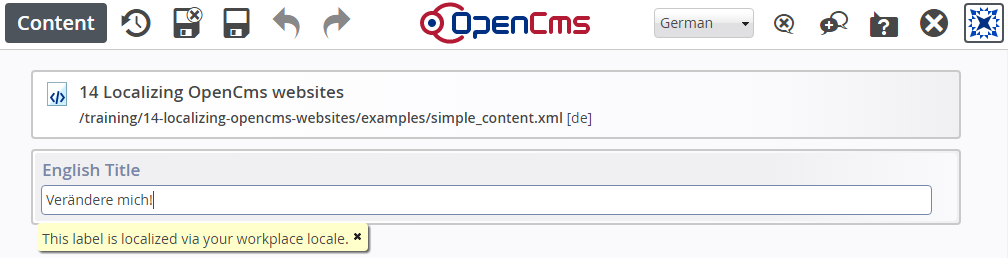
The editor dialogs are all shown localized in English, which is set as user preference and called workplace locale. The language of the content, or more specific the language version that is edited, is German, as you see in the "Language" switcher at the top of the editor. The locale of the content, we usually refer to as locale.
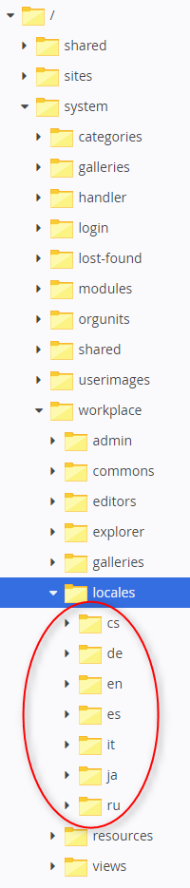
The workplace locale is set per user and can be chosen via his preferences, either via the traditional workplace's "Preferences" option, or the "Preferences" option in context menu of the ADE toolbar in the page or sitemap editor. The locales you can choose are determined by the presence of special folders: If a folder /system/workplace/locales/{locale} exists, the according language can be chosen. Thus, to add a new locale, or to delete a locale it suffices to just add or remove such a folder. In a default installation, the folders shown in the figure below are present.
If a folder with the locale's name is present, the according language can be set in the user preferences. If the messages are really localized accordingly depends on the message bundles located in the locale's folder. If keys are missing, English is chosen as default.
In a default installation, the locales shown in the figure are present.
Of course, adding a single folder is not sufficient to have a new locale. In the new folder, all message bundles (Java property files) necessary for the GUI localization must be present. If whole bundles or keys are missing, English is used as default. To see how these messages are structured, browse the subtree for de. In particular the messages subfolder is interesting. The structure is based on the different modules.
English message bundles are directly shipped within the workplace modules libraries (jar files), so you will not find the
messages subfolder under en.To put the message bundles you may add in your locale usable, you have to export your locale folder, say pt for Portugese, to {webapp home}/WEB-INF/classes. Therefore, put your localization in a module and set the export point via the module configuration.
For each resource type in OpenCms, you basically need three different localized values:
- Title (shown in workplace and ADE add wizard)
- Description (shown in workplace and ADE add wizard)
- Title for the "New" dialog of the traditional workplace shown when adding a new content of the type
The keys for these values have to be placed in workplace message bundles. Bundles ending with .workplace and property files name messages are treated special in OpenCms. They are called worplace message bundles. They conform to the following name scheme:
Resource type specific message keys
If you add a new resource type to OpenCms, using the "Add resource type" wizard in the "Module Management" in the administration view, the wizard does already all the configuration for the type in the opencms-modules.xml and adds the message keys just discussed to a suitable message bundle. This bundle is located under the i18n/ subfolder of the module folder and named {module name}.workplace. The keys are entered for the current workplace locale. So you just need to add keys for the other locales.Note that via the content editor you can only edit the locales configure (for website contents) which are not necessarily identical to the workplace locales. Localization as done by the wizard is the preferred way for localizing resource types.
Note that, to make the keys work, their use must be configured correctly in the
opencms-modules.xml. This is automatically done by the wizard as long as you do not leave the dialog fields empty where title etc. must be added.The appearence of the content editor of OpenCms relies heavily on the structure of your content. In particular, the form based editor shows all the schema elements of your content as an editor field. Such a field has a label and optionally a tooltip. Furthermore, the editor can have tabs, whose lables can also be localized.
The keys for such localization have to follow a special name scheme.
Localizing the content editor: Naming schemes for the message keys
The keys can either be added to the {module name}.workplace resource bundle that's included in the module where the resource type is defined in, or they can reside in a separate bundle, usually called {module name}.{resource type name}, also located in the module's i18n/ subfolder. The second option is the preferred one, but it requires you to make the message bundle explicitly available in the schema of the content (the XSD) by adding the following subnode to <xsd:annotation>/<xsd:appinfo>:
<xsd:annotation>
  <xsd:appinfo>
    <resourcebundle name="{name of the bundle}"/>
    <!-- more different nodes -->
  </xsd:appinfo>
</xsd:annotation>